thumeleaf
html에 출력 가능
jsp,jstl에 출력 가능 ( jsp,jstl 상위 )
spring에서는 잘 안씀
✅ 설치


application.properties 추가
#thymeleaf

# 템플릿 캐쉬를 비활성 - 소스를 수정시 바로 새로고침이 이루어짐
spring.thymeleaf.cache=false

# 템플릿 뷰를 이용하여 resources의 디렉토리를 활성화하여 사용함
spring.thymeleaf.check-template-location=true

spring.thymeleaf.enabled=true

# view 경로를 말함
spring.thymeleaf.prefix=classpath:/templates/

# view 파일 속성명
spring.thymeleaf.suffix=.html

# view에서 사용되는 연동 파일 랜더링 코드
spring.thymeleaf.mode=html
👀 Thymeleaf 사용법 1 - text , ArrayList , Map
- controller - datalist.do와 mapping
//thymeleaf로 데이터 출력
@GetMapping("datalist.do")
public String datalist(Model m) {
    String user="홍길동";
    m.addAttribute("user",user);

    List<String> all = new ArrayList<String>();
    all.add("Java");
    all.add("HTML");
    all.add("Spring-boot");
    m.addAttribute("all",all);

    Map<String, String> member = new HashMap<String, String>();
    member.put("mid", "apink");
    member.put("mname", "에이핑크");
    member.put("memail", "apink@naver.com");
    member.put("mphone", "01012345678");
    m.addAttribute("member",member);

    return null;
}
- datalist.html
templates 폴더 안에 생성
❗ thymeleaf 사용시 JSP 또는 JSTL 사용 X
<!DOCTYPE html>
<html lang="ko" xmlns:th="https://www.thymeleaf.org">
<head>
<meta charset="UTF-8">
<title>Thymeleaf 사용법 1</title>
</head>
<body>
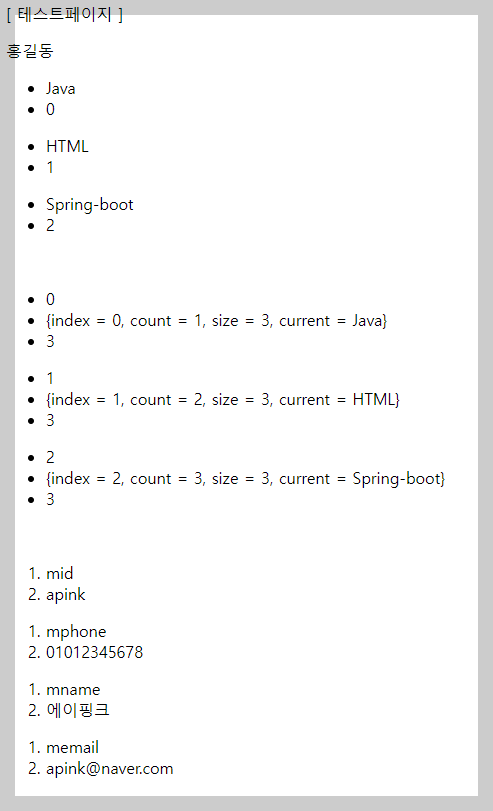
	[ 테스트페이지 ]
	<p th:text="${user}"></p>

	<!-- data(가상변수) : ${all}(배열값) -->
	<ul th:each="data : ${all}">
		<li th:text="${data}"></li>
		<li th:text="${dataStat.index}"></li> <!-- 가상변수명Stat.키배열명 -->
	</ul>

	<br>

	<!-- 배열 -->
	<ul th:each="data,list : ${all}"> <!-- ul이 돌아감 -->
		<li th:text="${list.index}"></li>

		<li th:text="${list}"></li> <!-- key배열 형태로 확인 -->

		<li th:text="${list.size}"></li>
	</ul>

	<br>

	<!-- key 배열(Map) => key, value 속성을 이용하여 출력 -->
	<ol th:each="userinfo:${member}"> <!-- ol이 돌아감 -->
		<li th:text="${userinfo.key}"></li>
		<li th:text="${userinfo.value}"></li>
	</ol>

</body>
</html>xmlns:th="https://www.thymeleaf.org" : thymeleaf 공식사이트 url임
=> thymeleaf를 명시하는 속성값
th:text
데이터 출력
th:each
배열 출력
가상변수명Stat.키배열명
가상변수 X 고정단어임
노드,갯수,데이터 도 가능
key 배열(Map)
key, value 속성을 이용하여 출력

👀 Thymeleaf 사용법 1 - dao, 조건문 , checked
- userDB_dao.java => DAO
@Getter
@Setter
@Repository("userDB_dao")
public class userDB_dao {
	int uidx;
	String uname,uemail,upass,ujoin;
}
- controller
//thymeleaf로 데이터 출력
@GetMapping("datalist.do")
public String datalist(Model m) {
    //dao를 이용하여 thumeleaf로 출력
    userDB_dao da = new userDB_dao();
    da.setUidx(10);
    da.setUname("강감찬");
    da.setUemail("kang@gmail.com");
    m.addAttribute("da",da);

    //이벤트 참여 여부
    String agree="Y";
    m.addAttribute("agree",agree);

    //select 목록
    String chart = "이름";
    m.addAttribute("chart",chart);

    return null;
}
- datalist.hml
<!DOCTYPE html>
<html lang="ko" xmlns:th="https://www.thymeleaf.org">
<head>
<meta charset="UTF-8">
<title>Thymeleaf 사용법 1</title>
</head>
<body>
	<!-- dao 값을 이용하여 출력하는 형태 -->
	<ul th:each="datadao:${da}">
		<li th:text="${datadao.uidx}"></li>
		<li th:text="${datadao.uname}"></li>
		<li th:text="${datadao.uemail}"></li>
	</ul>

	<br>

	<!-- 조건문 -->
	<div th:if=${agree=='Y'} th:text="${agree}"></div>
	<div th:if=${agree=='Y'}>동의함</div>
	<div th:if=${agree=='N'}>동의안함</div>

	<br><br>

	<!-- radio,checkbox checked하는 방식 , value값 넣는 방식 -->
	<input type="radio" name="agree" th:checked="${agree eq 'Y'}" th:value="${agree}">동의함
	<input type="radio" name="agree" th:checked="${agree eq 'N'}" th:value="${agree}">동의안함

	<br><br>

	<!-- select option selected -->
	<select>
		<option value="이메일" th:selected="${chart eq '이메일'}">이메일</option>
		<option value="이름" th:selected="${chart eq '이름'}">이름</option>
		<option value="제목" th:selected="${chart eq '제목'}">제목</option>
	</select>
</body>
</html>

'CLASS > SPRINGBOOT' 카테고리의 다른 글
| #6-1 / Thymeleaf 외부파일 로드 , layout (0) | 2024.08.21 |
|---|---|
| #5-2 / thymeleaf로 데이터 출력 2 (0) | 2024.08.20 |
| #4-2 / Bootstrap - 회원가입 (0) | 2024.08.19 |
| #4-1 / Spring boot - 파일 업로드 (0) | 2024.08.19 |
| #3-1 / 회원 로그인 (외부 로그인 API 연동) (0) | 2024.08.14 |